Garment factory toilet construction edition│AGLUCA, an apparel company in Yamanashi
We would like to introduce the construction of a ``toilet'' at a sewing factory.
We will install toilets where there were none. We also requested airtight construction.
◼︎Prerequisite information
・Purchased a used cast concrete (RC) property in Shiotsu, Uenohara City, Yamanashi Prefecture.
・The first floor, which was originally a warehouse and parking lot, will be renovated to create an apparel sewing factory.
・Since there is no insulation or secrecy, and the performance of the original windows and sashes is low, we aim to make the building highly airtight and highly insulated through renovations to create a comfortable working environment.
・Request to a local construction company in Uenohara City
◼︎Other articles introducing the process of establishing a garment factory
・Wall construction sashes and windows, moisture-permeable waterproof sheets
・Construction of ceilings, ventilation systems, electrical piping, and air conditioning
・Wall insulation/secrecy and toilet piping edition
・Floor installation (standing floor / double floor method) and floor insulation
・Electrical wiring and air conditioner piping
・Construction of plasterboard and cross base plywood on the wall
・[Floor/wall construction continued] Installing plywood on top of particle board
・ Installation of putty and mesh tape before pasting wallpaper (cloth)
・Wallpaper (cross) construction
・Construction of multilayer vinyl floor tiles (PVC floor)
It used to be a place like this.

This image shows electricity and rails installed on the ceiling one month after we started the renovation.
Install a new toilet where the ladder is located in the back right.
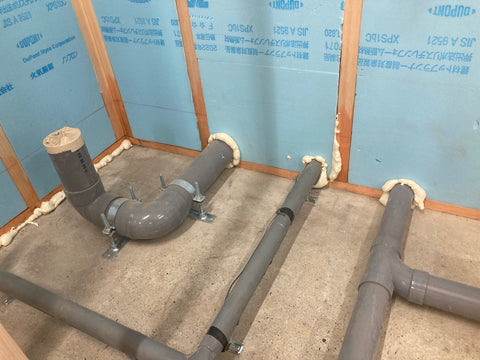
Installation of piping

Drill three holes in the concrete wall and pass the pipes through.
Thin piping is for water purification
Thick piping is for drainage
Create a wooden frame to make the wall of the toilet and install insulation material on the wall (Styrofoam)

Blue is Styrofoam (insulation material)
Fill the gaps in the piping with sprayed urethane foam to make it airtight.
The top left of the photo is the pipe for the toilet.
The thin part in the middle is the water pipe
The pipe on the right is the kitchen pipe.
We will make the floor using the floor construction method.

The toilet is in the back right and the kitchen is in the middle of the photo.
We will start constructing the floor around the toilet.

Floor construction

We will also install a floor in the toilet and build a wall with plasterboard.
After creating the toilet wall with plasterboard, etc., construct the entrance frame.

Installed Panasonic interior door VERITIS MJF series

Installation of wallpaper, flooring and doors

Installed toilet bowl and paper holder towel rack

Install paper holders and shelves for toolbox

When using the net shelf, I folded it down so that I could store my cell phone and wallet.
Install the marine light and toggle switch in the toolbox

Construction of shelves to store toilet paper, etc.

tool box storage shelf
